Sunday, April 30, 2023

The tower room bathroom

After the closet was completed we started the bathroom. As I stated in an earlier post we ran the sewer line and water lines through the columns in the parlor.   


The floors were leveled by sistering new boards to the existing floor joists.

The new subfloor was installed using Advantech subflooring. It's manufactured to be water-resistant.  A bit more costly but just what you need in a room with the potential of high moisture.

The floor, ceiling, and party walls were insulated with Rockwell soundproofing batts. Fiberglass batts were added for some additional soundproofing.

The east wall is an exterior wall consisting of three layers of brick. Foamboard was added to help with insulating the bathroom.

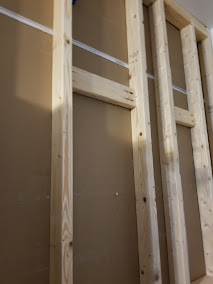
The framework for the bathroom pocket door was built. The top 60% of the framework included planks to make it solid so fixtures would be mounted on the finished wall.

Everything is framed in, ready for the drywall.

Chris does the mudding and taping in the family (she's better at it than I am). All ready for sanding and painting.

After the walls were painted, the final touches were completed such as installing lighting.

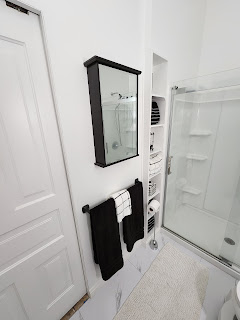
Photos of the completed bathroom. (By the way, the flooring is LVP with a marble look). For storage, we constructed built-in shelving for towels and other nick-nacks. 


A walk-through video of the bathroom.

A look at the closet and bathroom pocket doors from the tower room. (The tower room work will begin in the near future.) Thanks for joining us on this journey.


Sunday, April 23, 2023

Remodel of the 2nd floor tower room (the closet)

The adjoining room to the tower room is where our bed is located. The tower room was vacant except for the clothing closet. The only bathroom (or "CR" if you live in the Philippines) is at the north end of the hallway, roughly 60' from the tower room. There is a second "CR" in the house but it is located between the kitchen and dining room on the first floor. Needless to say, having only one bathroom on the second floor (where all of the bedrooms are located) is very inconvenient when the house is full of visitors. So we decided that the tower room could be put to better use with some minor modifications.

First, we needed to redesign the closet. The wall space where the closet originally was, actually had two closets, one that opened into the tower room and one that opened into the master bedroom. The plan was to shorten the closet in the west-east direction and lengthen it in the north-south direction. Then the closet door that opened into the tower room would be walled off with a new doorway created. By doing this we would have a tower closet similar in square footage to the original, but the modification would allow us to create a bathroom off of the tower room.

After everything was planned out we started on the modifications. First, the door from the tower room into the main hallway was walled off. Then I started with the framing of the closet. A party wall was built to separate the closet and the new bathroom. 


                                                (Party wall from the shower side of the wall)   


(New Closet to the left, new bathroom to the right)

We decided to make pocket doors because they take up less space than hinged doors. The doors we used were the original hinged doors. This meant that I needed to build the framework for the closet and bathroom pocket doors.


After the walls were framed and the pocket door was installed then we put down the flooring. The floorboards we used were the original boards. We planed the boards before installing them. 


Two rods were installed on the east wall and one on the north for clothes on hangers. Shelves were added above the rods. LED light strips were attached to the underside of the shelves to illuminate the clothes. The baseboard was attached to finish the closet. Although the closet may seem small, it is still a walk-in closet. Even with clothes in the closet, there is still enough standing room to dress. 

*(I did not take a picture of the finished closet before we put our clothes in it so I am not including a picture on this blog).