Sunday, January 11, 2009

The dining room ceiling is taken down

Saturday we took down the dining room ceiling and installed insulation and one sheet of drywall, more to follow on Monday. This is one of the last plaster ceilings that needed to be taken down. The only ceilings left now are the entryway and the ceiling above the main staircase.


Who would have thought that one ceiling would produce nearly 2 cubic yards of debris? I put my weight to good use, jumping up and down in the dumpster to compact the demo trash.


We were blessed to have a crew of friends to help with the takedown. Takedown and cleanup took approximately an hour and a half, which would have taken me all day to do by myself.


(Left to Right: Daniel, Chris, Michael, James)


(Chris and Russ)


(Chris, Russ, Chris)

And as for me, well I got a little dirty from the takedown.


Look ma, no black gunk!

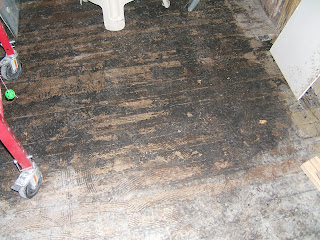
Remember this picture of the linoleum backing and adhesive that was left after we removed the linoleum?


We tried steam, chemicals, heat and hard labor. Finally, I rented a floor sander and 20 grit sandpaper. It was hard work but the results were better than the other methods.


Now we can stain and seal the floor.


Sunday, January 4, 2009

The kitchen is progressing

We have painted the kitchen (although we are not through with the trim work). A ceiling fan was installed to provide light and hopefully force some of the heat from the high ceilings (128" ceilings) back down.

(This picture was taken with a flash.)


The lights from the ceiling fan create an interesting design on the ceiling and walls.

(Picture was taken without flash.)

Success at last

Some of the wood trim was painted with Kemtone paint. We tried a heat gun, chemical paint removers and sanding. The method that has worked best is a cheap paint scraper. With time and work we will be able bring back the beauty of the original wood. (We thought that our only solution would be to paint over the old paint.)


Curse you Linoleum!!!!

We undertook the task of removing the linoleum from the kitchen, small hallway, and bathroom. It was not an easy task. After Chris did much research on how to remove linoleum, the best suggestion we found was steam and a lot of work with a scraper (resulting in blisters to prove it.)
Chris using cheap (Dollar Store) irons that we purchased to provide the steam. I've included a search for you do-it-yourselfers on how to remove linoleum-(http://www.google.com/search?source=ig&hl=en&rlz=&q=scraper+linoleum&btnG=Google+Search&aq=f). You will find out that everyone has an opinion. (My opinion...don't use linoleum!)

The result after much effort is no linoleum, but now we have a black adhesive mess to deal with.

Krud Kutter and a paint scraper worked on removing the adhesive and paint, getting down to the natural wood. Next, we will sand the floors to prepare them for a protective covering. So, here's the story of the wood floors, they were painted and later covered with linoleum. We hope to restore the natural wood...wood is good!

I am trying to find a curse for people who like and enjoy linoleum. Any suggestions would be appreciated. So if you're someone who loves linoleum and your next attempt to install it does not go so well, chances are I've found a curse for you.